

{Scroll to the bottom of this post for a YouTube video I made showing the entire process…and subscribe while you’re there!}
If you asked me 2 years ago if I would ever ditch soy and nut milk{ for cow’s milk I’d have looked at you like you had two heads. Yet here I am…drinking a cow’s milk homemade latte as I type this post. What the hell happened??
I (Lynn) have been vegan for about 8 years (although not always strict) and a vegetarian since about 9th grade. I really didn’t miss dairy…especially since I got fairly good at making nut-based cheeses and homemade almond milk. But, after reading Animal, Vegetable, Miracle by Barbara Kingsolver I started to really think about things (like how far my food has to travel to get to me). And when I started to track our trash and recyclables I realized my choices in food and drink were often not sustainable. (Note that while Terra Cycle offers recycling options for some hard-to-recycle items like those aseptic milk cartons and the little plastic things daily, weekly or monthly contact lenses come in these items have to be shipped to faraway facilities that can actually handle that type of stuff. And just because your town has a recycling drop off point doesn’t mean it has a recycling facility).

Just a small fraction of the containers we have eliminated by switching to local raw milk in reused glass jars. This might be a week’s worth.
Once we settled here at Mutiny Ranch in small-town Colorado I found locating organic almonds at a reasonable price was impossible. I could get them shipped to me from afar but it wasn’t very cost-effective either. Feeling I had no options (if I wanted to stay vegan and place that above eating local) I started buying soy or almond milk in cartons. I also bought different soy milk in shelf-stable packs dedicated to making vegan yogurt (or commercial vegan yogurt in plastic containers). Then there was the vanilla creamer in plastic bottles and vegan creamer in little cartons. The non-recyclable trash piled up and we had to dedicate a large part of our sunroom to recycle storage because there’s no curbside recycling here (we have to haul it all to town and it has to be separated). Then…I read the book Junkyard Planet by Adam Minter and found out recycling is kind of a greenwashing, feel-good illusion that makes us think it’s not so bad to buy water in plastic bottles as long as we toss it in the recycle bin (not to sound all conspiracy theory but it’s not nearly the answer to our problems as we are led to believe and it’s not “clean”)**.
Let me tell you…the best way to motivate yourself toward zero-waste is to save up your recycling and trash and take a good, hard look at what’s going in there on a regular basis.
In the midst of all of this, I was interning part-time at Fury’s Funny Farm where I learned to milk a cow. This is a cow who lives with her calf and her own mother. She is turned out to pasture and treated with love. I saw with my own eyes how she is cared for, what she eats and the quality of life she enjoys. I learned to take some of her milk (the calf was nursing too) and separate the cream to make butter and yogurt.
It was time to give cow’s milk a shot. The decision was three-fold…support a small local farm with sustainable practices, improve our health (there are, arguably, many health benefits that come with the use of raw dairy products) and reduce the amount of recyclable and non-recyclable waste.
I didn’t get ill or have any digestive issues so we started getting raw cow’s milk every week. With that milk, we are able to get cream for coffee (I make a sweet vanilla creamer substitute for Clark’s coffee), butter, ghee, yogurt, milk kefir, whey, and buttermilk. I sometimes make mozzarella cheese and ricotta. The whey (from the yogurt and cheese) gets added to the chicken feed or to the water I use to soak oatmeal or beans. The buttermilk gets added to bread dough (instead of water) or is frozen to use later in recipes or soap making. I try not to let any of these byproducts go to waste.
It may seem intimidating to make all of this yourself but it’s not difficult at all. And making butter (and ghee) is not only simple but it’s fast and rewarding (just wait till you taste it). You also don’t have to find a source for raw milk (although I would recommend it if possible) since almost all grocery stores carry cream (try to get organic and, if possible, grass-fed).
Here’s the low down:
Homemade Butter

The large jar is the milk after skimming the cream off the top. The small jar is the cream.
1) If you’re using milk straight from the cow, separate the cream from the butter (I use a soup ladle). The milk I get has a clear line of separation and, as they say, the cream rises to the top. In my one-gallon jars anywhere from 1/4 to 1/3 of the top is a thick cream.

My beloved Vitamix. It’s over 20 years old and still going strong.
2) Pour the cream into your blender.
3) Turn the blender on and slowly raise the speed until it’s at full speed. This just keeps the cream from splashing all over.
4) Wait patiently.
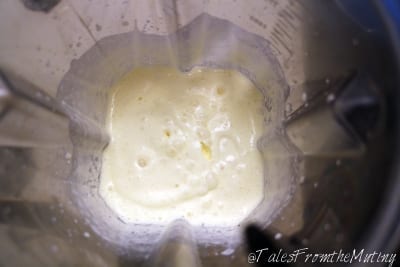
Hey! Whipped cream!!
5) Listen carefully for a change in sound from the blender. It’s a noticeable change because the cream is getting aerated and turning into whipped cream (the first stage).
6) You may need to turn off the blender and scrape down the sides if your cream is extra frothy. Slowly raise the speed of the blade again until it’s at full speed.
7) Listen for the change again. It shouldn’t take too long!

Butter flakes!
8) Turn off the blender and observe the little yellow chunks floating on top of the butter milk. Note: this entire process took me about 3 1/2 minutes including stopping for photos. =)

Straining off the buttermilk.
9) Pour contents of the blender into a wire mesh strainer with a bowl placed underneath. You’re now separating the butter from the buttermilk. Let it drain for a few minutes.

Squeeeezing out the buttermilk.
10) Dump the butter into a bowl and use a spoon to squeeze and press the butter. The goal is to remove as much of the liquid buttermilk as possible. Keep draining off the liquid. Once the butter starts to stick together you can rinse it under cold water…squeezing it in your hands or kneading it will help release the buttermilk. Your butter will taste fresher longer if you can get most of the buttermilk out. If you’re going to make ghee with your butter you don’t have to be as thorough as it will all get cooked off.

Ta Da! The finished product!
11) Season as desired. You can salt your butter and/or add herbs and spices. Basil butter is amazing but your options are really only limited by your imagination. Granted, it does take a lot of cream to make a little butter so you might want to start with some tried and true herbs before getting too creative. If you want to make ghee skip this step…don’t even add salt.
Just like regular butter you’ll want to keep this refrigerated, especially if you used raw cow’s milk. Food safety is important so educate yourself on handling raw milk and storing dairy products properly.
Homemade Ghee
Ghee is a form of clarified butter (here’s the Wikipedia page). The process of making ghee removes the milk from the fat so it is often tolerated by those with lactose issues. Ghee has a higher smoke point so it is better suited for some cooking applications which could burn the butter. It also has a nuttier flavor and smells divine. It’s used in traditional Indian cooking and in Ayurveda. It’s now my preferred fat (my unpreferred fat is on my hips).
1) Take your homemade butter and place it in a small saucepan (you can also use store or farmer’s market butter but I would recommend the unsalted version since the process of making ghee removes some of the liquid and can concentrate the salt).
2) Set the heat to low and allow your butter to slowly melt. I like to use my induction cooktop because it’s super-efficient and it gives me the option to choose a cooking temperature rather than guessing at low, medium and high heat settings.

3) Once the butter has melted turn the heat to medium-low or medium. A white foam will form on top of the butter. Stir slowly to keep things from sticking to the pan. Adjust to a lower setting if necessary…we want to simmer the butter slowly, not boil it or burn it.

Notice the liquid is cloudy and the foam is gathering together.
4) Keep a close eye on the butter. You’ll notice the foam will start to gather into groups and you’ll see the cloudy liquid underneath. You can stir occasionally to make sure nothing is sticking but try to let it do its thing. The foam will start to turn more toward large bubbles and there might be some milk solids or foam starting to stick to the sides of the pan. This is all good.

5) After a few minutes the white foamy top will start to become a mass of clear bubbles. The cloudy liquid will begin to become clearer.

6) Once the bubbles and liquid are all clear you’re almost done! Give it a stir and see the milk solids at the bottom of the pan. The liquid should take on a golden hue. The milk solids will turn golden (try not to allow them to burn!). Also, take a sniff. Ghee will have a butterscotch like smell. A good indication that it’s done is that it will began to form another foam. But I also recommend going by smell. And oh my gosh is it heavenly!

7) Using a fine mesh strainer lined with several layers of cheesecloth or, in a pinch, a coffee filter pour your ghee and allow it to drain. I place my desired container (a canning jar intended to handle the heat) directly under the strainer. Allow it to filter and then cool completely before adding the lid.

Isn’t this so beautiful!! Liquid gold!

Creamy, rich and delicious!
Ghee, made correctly, should be shelf-stable for a few weeks but I usually err on the side of caution and, since I make a lot of ghee, place it in the refrigerator (maybe one day I’ll have a cool root cellar where the temps don’t rise to 85 degrees in summer). The milk solids can be tossed or composted or even added to bread dough.
You can add salt or spices if you’d like but (so far) I’ve left mine plain and it is soooooo good.
Again, always practice food safety and research a variety of sources for health benefits or concerns since, you know, I’m not a doctor.
Here are the actual tools I use in the Mutiny Kitchen to make butter and ghee (and lots of other things!). The Vitamix listed below is a newer model of my 1993 version. Clicking these photos will take you to the products on Amazon using our affiliate links. It costs you nothing extra but may put a few dollars in our account which will help pay for our blogging costs. We appreciate your “clicks” and, in return, we promise to feature only products and tools we actually use and recommend to family and friends.


**Articles highlighting the failure of recycling
China’s ban on imported recycling
China Bans Foreign Waste
91% of Plastic Isn’t Recycled
The Problems For Recycling
Is Recycling Worth It
While we are trying to eliminate our need to use recycling we still create a lot of it. We recycle what we can but are trying to find alternatives by reducing our needs, reusing what we can, repurposing items in creative ways and refusing goods that are over-packaged when possible.
You might also like


Leave A Reply