

Ta-Da!
Just to be clear, I am no seamstress. I know this, but it doesn’t seem to squelch my desire to sew. I wish I harbored no delusions but delusional I must be because I still buy fabric by the yard and an occasional pattern. Somewhere in my mind there’s a disconnect. I look at sewing projects like recipes…and I’m fairly proficient at following most recipes. But sewing? Sigh, it still alludes me.
Truthfully, there have been quite a few purchases I’ve put off because I’m sure I can DIY “it” (whatever “it” happens to be). And this includes items that would need to be sewn…like pillows and curtains. I’ve cheated by cutting curtains in half and then flipping them upside down to use the already-sewn-hem as the curtain rod pocket (just cut a couple of tiny slits in the hem to insert the rod) only to have the fabric unravel over time. It’s silly really, considering I’ve owned a sewing machine for the past 4 years. Yep, I even carried it while we were fulltime RVers after my mom sewed the curtains for our RV remodel.
But I’ve decided it’s time to work on the home part of homesteading. Part of that inspiration came from some holiday shopping when I bought an adorable bag made from an old coat and two throw pillows made from an old Pendleton blanket (I should be able to make these myself dammit!). The other inspiration has come from our very cold house. Lots of windows makes for a drafty home (and propane is quite expensive).

Two twin sheet sets…just $3 at the thrift store.
So, I dusted off the sewing machine and headed to the thrift store. I found two nice flannel twin bed sets (matching) and decided I would use the pillow cases to make several window and door draft stoppers and then use the flat sheets to add another layer of insulation to our living room windows. I’ll eventually figure out how to cut the fitted sheets into useable fabric for more window covers. But for now, here’s my draft stoppers.

Prepping to cut into thirds.
I read other tutorials saying to measure the width of the pillow cases and divide by four. This way you get 4 stoppers per case but our door gaps are fairly large, especially since we’ve removed most of the carpeting in the house. So, I divided my pillow cases into three equal stoppers. They measured (roughly) 31.5″ long by 6″ wide before sewing. A cutting mat like this one really helps (and makes you feel like you know what you’re doing).

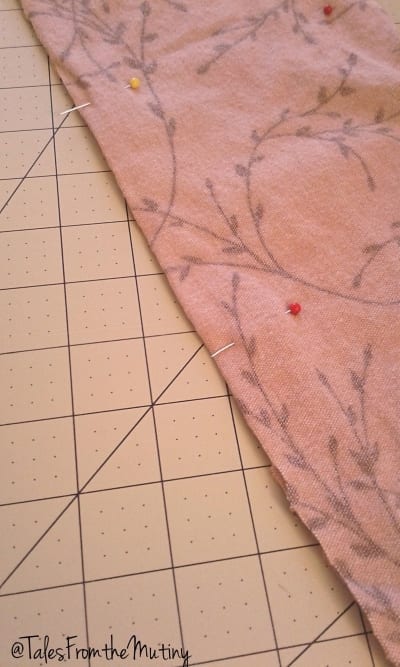
After cutting the pillow case into it’s 3 strips, I turned the fabric inside out and pinned the long side(s) with straight pins. Remember to keep the small end open (for now). This nice thing about using pillow cases is that you won’t have to sew every single edge since someone already did that for you. And, if you’re lucky, you won’t have to cut the length down either because it will fit your door opening as well.
Now, as I made perfectly clear, I am not a seamstress. I had to Google how to thread my machine. And how to add thread to the bobbin. And how to put the bobbin back in the doo-hickey. I even had to get my reading glasses out because I can’t see well enough to thread the damn needle any more. By the time I was ready to attempt my first straight-ish line I was covered in stray threads and bleeding from sticking myself with the straight pins that kept getting stuck in my shirt sleeves.
Straight pins…handy helpers or evil pokey things?
It was about this time when Clark came barging into my sewing room (aka the kitchen) and kinda made fun of what was going on. This caused me to look up at him while still wearing my readers. Naturally, I got dizzy and probably a little cross-eyed which caused even more laughter from the peanut gallery. How rude! Being the loving wife I am, I told him to go screw himself and then set to task.

My sewing center…
I managed to sew a mostly straight line, removed the straight pins (that’s important, trust me) and then turned the (now) tube right side out. Now I needed something to fill it with…so I took a break and started looking through closets and the little shop outside. Two things I’ve been hoarding selectively saving were exactly what I needed. One was a few pounds of very, very, very old rice and the other was some hideous lawn chair cushions the goats had tried to eat.

Buster and Ewan did quite a number on these cushions!
I salvaged the stuffing from the cushions and used it to stuff the “tube”. I then carefully (well, carefully the second time) poured about a pound of rice (4-6 cups) into the tube. I sewed up the small end of the tube and worked the rice down to try to distribute it evenly along it’s length. Finally, I popped that bad boy along the guest door and BAM! It worked perfectly.
Ta-Da!
Feeling pretty proud of myself, and reveling with my new found sewing abilities, I quickly made 5 more door/window draft stoppers. I ran out of old rice so I used some inexpensive cat little ($1.18 per 7 pound bag) for several of the them and it worked well too. Well, except for the one stopper I somehow mis-sewed so all the cat litter spilled out of it when I turned it over. Go figure!
All in all I think they look really good (if you don’t look too closely). But better yet, they work! There’s a noticeable difference, especially with the one’s I put in the windows, and I’ll be using the fitted sheet to make more.
Now that Christmas is behind us I’ll have the time to tackle the window coverings. I’m looking for unique double curtain rod holders. Preferably DIY or repurposed. Okay, cheap. I’m looking for cheap curtain rod holders so if you know of any please comment below.
You might also like


Leave A Reply